Difference between revisions of "LMD DialogCreator Guide"
(Created page with "{{Head-StartRes}} == Layout == The screen is laid out to represent a dialog at runtime. Each available section is displayed on the screen. With the exception of the Help Link ...") |
m (moved LMD DialogPack Guide to LMD DialogCreator Guide) |
||
| (3 intermediate revisions by the same user not shown) | |||
| Line 3: | Line 3: | ||
== Layout == | == Layout == | ||
| − | The screen is laid out to represent a dialog at runtime. | + | The screen is laid out to represent a dialog at runtime:<br> |
| + | [[Image:dialogcreator.png]]<br> | ||
Each available section is displayed on the screen. With the exception of the Help Link section, which isn't displayed until the doShowHelpLink checkbox is checked in the Options group. | Each available section is displayed on the screen. With the exception of the Help Link section, which isn't displayed until the doShowHelpLink checkbox is checked in the Options group. | ||
| − | Note: Currently some elements are not displayed in the dialog. These include the following options: | + | '''Note: '''<br> |
| + | Currently some elements are not displayed in the dialog. These include the following options: | ||
| − | # Radio Buttons | + | #Radio Buttons |
#Command Links | #Command Links | ||
#Progress Bar | #Progress Bar | ||
| Line 24: | Line 26: | ||
To stop editing in a section, just click outside of it. You can click one of the toolbar buttons, and changes to the active editor are kept. | To stop editing in a section, just click outside of it. You can click one of the toolbar buttons, and changes to the active editor are kept. | ||
| − | '''Expando Specifics''' | + | '''Expando Specifics'''<br> |
There are two sections that display Expando (More Lines) for a section name. This is because an expandable dialog can display the additional content within the dialog body (content area) or in the footer. Completing the section where you want the additional content to display will make sure the generated code and/or DFM sets the Expando.ShowInFooter property correctly. | There are two sections that display Expando (More Lines) for a section name. This is because an expandable dialog can display the additional content within the dialog body (content area) or in the footer. Completing the section where you want the additional content to display will make sure the generated code and/or DFM sets the Expando.ShowInFooter property correctly. | ||
Latest revision as of 07:00, 12 July 2013
<< Back to Getting started or Product Resources page
Contents
Layout
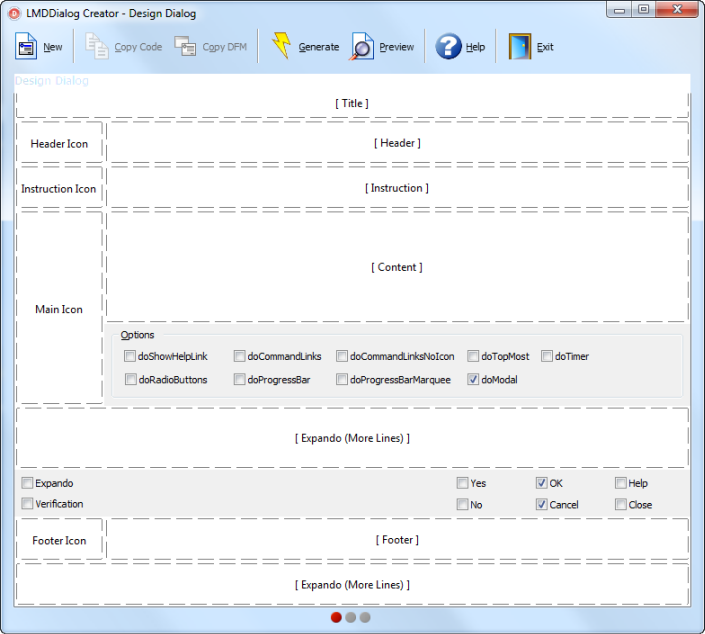
The screen is laid out to represent a dialog at runtime:

Each available section is displayed on the screen. With the exception of the Help Link section, which isn't displayed until the doShowHelpLink checkbox is checked in the Options group.
Note:
Currently some elements are not displayed in the dialog. These include the following options:
- Radio Buttons
- Command Links
- Progress Bar
- Top Most (not UI related)
- Timer
- Modal (for previewing the Modal property is deliberately ignored)
Editing Sections
To Edit a specific section, double click on it. An appropriate editor will display. The following editor types are supported:
- Single Line text
- Multi Line text
- Icon selection
To stop editing in a section, just click outside of it. You can click one of the toolbar buttons, and changes to the active editor are kept.
Expando Specifics
There are two sections that display Expando (More Lines) for a section name. This is because an expandable dialog can display the additional content within the dialog body (content area) or in the footer. Completing the section where you want the additional content to display will make sure the generated code and/or DFM sets the Expando.ShowInFooter property correctly.
If additional content is added in both expando sections, then the content displayed in the dialog body takes precendence (ShowInFooter = False).
It is possible to navigate between the three available pages in the interface by using gestures (left and right to change page) and clicking on the gray circle at the base of the dialog. The red circle indicates that active page. The current page is displayed in the caption of the window, in the screenshot on this page, the active page is the Design Dialog page.
Depending on the toolbar button selected, the active page in the interface will change.
| Toolbar Button | Active Page |
|---|---|
| New | Design Dialog |
| Copy Code | Generated Code |
| Copy Dialog | Generated DFM |
Commands
New
Use the New command to reset all settings back to their defaults. This means all changes made will be lost.
Copy Code
Copies the code to the clipboard required to create the dialog within code. The interface also changes to display the generated code.
Copy DFM
Copies to the clipboard the code required to paste the dialog on to a form within your application. The interface also changes to display the generated DFM.
Generate
Generates the source code and DFM representation of the designed dialog. Changes to automatically display the generated source code. Use either the Copy Code or Copy DFM commands to copy the desired dialog representation to the clipboard.
Preview
Display the dialog as it would appear if run by the end user.
Note: Some settings are not available when displaying a dialog in preview mode, although currently these settings cannot be changed in LMDDialog Creator yet.
Help
Display the help web page.
Exit
Closes the application.